What is a hitch bike rack with ramp instructions? This refers to a comprehensive set of guidance for using a vehicle-mounted carrier equipped with an integrated or detachable incline designed to assist in loading heavy bicycles. These systems are essential for 2026-era electric bikes, which often weigh between 60 and 90 pounds, making manual lifting a significant physical risk for many riders.
As we move deeper into 2026, the cycling landscape has shifted dramatically. E-bikes aren’t just a niche anymore; they are the standard for both commuters and trail enthusiasts. However, the “lifting” part of the equation remains the biggest barrier to entry. I’ve seen countless riders struggle with their backs or, worse, scratch their expensive vehicle paint trying to hoist a mid-drive mountain bike onto a standard platform. That is where a hitch bike rack with ramp instructions becomes more than just a manual—it becomes your blueprint for independence.
The integration of ramps into hitch-mounted systems has matured significantly this year. We are seeing lighter, telescoping aluminum ramps that store directly within the rack frame. This guide is designed to bridge the gap between owning a heavy bike and actually getting it to the trailhead without needing a physical therapist on speed dial. Whether you are dealing with a Class 3 receiver or a smaller 1.25-inch setup, understanding the geometry and mechanical advantages of these ramps is crucial for safe transport.
Quick Comparison: 2026’s Top Ramp-Integrated Racks
| Product Name | Best For | Max Weight per Bike | Ramp Style | Price Range |
| Hollywood Racks Destination E | Heavy E-Bikes | 70 lbs | Long/Internal | Around $650 |
| Yakima OnRamp | Diverse Tire Sizes | 66 lbs | Adjustable/Removable | $600 – $700 |
| Thule T2 Pro XTR + Ramp | Premium Durability | 60 lbs | Add-on/Folding | Around $900 |
| Kuat NV 2.0 + Transfer | Aesthetic & Utility | 60 lbs | Optional Telescoping | $850 – $1,000 |
| Saris Door County | Electric Assistance | 60 lbs | Full Electric Lift | $1,100 – $1,300 |
Expert Data Analysis
Looking at the data above, the Hollywood Racks Destination E emerges as the heavy-weight champion for those prioritizing pure lifting capacity at a mid-range price. However, if you are moving between different bike types—say, a fat tire e-bike and a slim-tire road bike—the Yakima OnRamp provides better cradle versatility. For those who want the absolute premium experience where the rack does the physical lifting for you, the Saris Door County justifies its higher price point by utilizing the vehicle’s 7-pin power connector.
💬 Just one click — help others make better buying decisions too! 😊
Top 5 hitch bike rack with ramp instructions: Expert Analysis
1. Hollywood Racks Destination E — The E-Bike Powerhouse
The Hollywood Racks Destination E is purpose-built for the heavy-duty rider who doesn’t want to overcomplicate the loading process. It features a fold-down ramp that is significantly longer than older 2024 models, which reduces the incline angle.
Key Specifications & Practical Meaning:
-
70 lb capacity per bike: This ensures even the most “overbuilt” e-bikes with dual batteries are supported without frame flex.
-
Integrated locking system: In 2026, bike theft is a high-tech game; having unified locks for the rack and the bikes is a baseline requirement for peace of mind.
-
Extra-wide wheel cradles: These accommodate tires up to 5 inches, meaning your winter fat bike fits just as well as your summer cruiser.
Expert Opinion: In my experience, the standout feature here isn’t just the weight limit; it’s the ramp’s “bridge” design. Most ramps have a lip that can catch on the rack’s tray, but this model provides a seamless transition. If you are loading a bike alone, that smooth transition is the difference between a successful load and a tipped bike.
Customer Feedback Summary: Users consistently praise the stability of the hitch tightener, though some find the rack a bit heavy to install initially (it weighs about 46 lbs).
-
✅ Easiest ramp transition in its class
-
✅ High weight ceiling for 2026 dual-battery bikes
-
✅ Includes all locking hardware
-
❌ Rack itself is quite heavy
-
❌ Folding mechanism requires some hand strength
Price Range: Around $650
Value Verdict: The gold standard for value-to-capacity for serious e-bike owners.
2. Yakima OnRamp — The Versatility King
The Yakima OnRamp was specifically designed to tackle the “ramp problem” from the ground up. Unlike other racks where the ramp feels like an afterthought, here it is the star of the show.
Key Specifications & Practical Meaning:
-
Adjustable frame attachments: Unlike “hook” style racks, this uses padded cradles that can move to avoid fenders or mid-drive motors.
-
Stowable ramp: The ramp clicks into the rack frame when not in use, so you don’t have a dirty piece of aluminum rolling around in your trunk.
-
Off-road rating: It is rated for 40 lbs per bike when traveling on gravel or fire roads, which is rare for ramp-enabled racks.
Expert Opinion: What most buyers overlook about the OnRamp is how it handles fenders. If your e-bike has full-coverage fenders (common on 2026 commuter models), most racks that “hook” the front wheel will crush your plastic guards. The Yakima avoids this entirely. It’s my top pick for city commuters who occasionally hit the light trails.
Customer Feedback Summary: Riders love the lightweight feel of the aluminum components, but a few have mentioned that the ramp can be a bit narrow for 4-inch fat tires.
-
✅ Fender-friendly mounting system
-
✅ Very lightweight and easy to remove from the hitch
-
✅ Excellent storage for the ramp
-
❌ Narrow ramp can be tricky for fat tires
-
❌ Lower total weight capacity than the Hollywood
Price Range: $600 – $700
Value Verdict: Best for the “everything” rider who owns different types of bikes and values ease of use.
3. Thule T2 Pro XTR — Premium Modular Design
The Thule T2 Pro XTR doesn’t come with a ramp in the base box, but the optional Thule loading ramp add-on makes it one of the most stable systems on the market. Thule remains a leader in NHTSA-style safety testing, which shows in the rack’s rigidity.
Key Specifications & Practical Meaning:
-
AutoAttach system: You don’t need a wrench to install this; a knob expands a wedge inside the hitch to eliminate wobble.
-
Integrated wheels: When the rack is off the car, you can roll it around your garage like a piece of luggage.
-
Tilt-lever: The large handle at the end of the rack allows you to tilt it down with one hand even when bikes are loaded.
Expert Opinion: I’ve found that the Thule T2 is the “iPhone” of racks. It’s polished, everything clicks into place, and it just works. While buying the ramp separately is a bit of a “tax,” the ramp itself is telescoping and extremely sturdy. If you have a high-clearance SUV, you’ll appreciate the extra length of the Thule ramp to keep the grade manageable.
Customer Feedback Summary: The “Roll-and-Stow” wheels are a fan favorite, though some users find the price tag difficult to swallow once you add the ramp accessory.
-
✅ Best-in-class stability and lack of “hitch wobble”
-
✅ Easy to move around the garage
-
✅ Exceptional build quality and weather resistance
-
❌ Ramp is an additional purchase
-
❌ Most expensive option in the Top 5
Price Range: Around $900 (with ramp)
Value Verdict: For the rider who wants a “buy it once” product and doesn’t mind the premium entry price.
4. Kuat NV 2.0 — The Boutique Choice
The Kuat NV 2.0 is widely considered the most beautiful rack on the market, but its functionality is equally impressive when paired with the Transfer/NV Ramp accessory.
Key Specifications & Practical Meaning:
-
Built-in Repair Stand: This is a 2026 lifesaver—you can clamp your bike into the rack to perform trailside maintenance or chain lubing.
-
Front tire cradles with security cables: The cables are tucked away inside the rack, providing a clean look while keeping thieves at bay.
-
Pivot system: The foot-assist pivot allows you to drop the rack without using your hands, which is helpful if you’re carrying gear.
Expert Opinion: The spec sheet won’t tell you this, but the Kuat’s metallic finish is surprisingly durable against road salt. If you live in the Northeast or near the coast, this rack will look new long after the competition starts to show rust. The ramp is a separate add-on, but it is one of the few that is wide enough to handle a 5.0-inch fat tire without the bike “walking” off the edge.
Customer Feedback Summary: Users rave about the repair stand, though some note that the front tire hook can be tight on bikes with very large 29+ setups.
-
✅ Includes a functional bike repair stand
-
✅ High-end aesthetics and rust-resistant finish
-
✅ Wide ramp accommodates all tire sizes
-
❌ Pricey when adding the ramp and 2.0 base
-
❌ Heavier than the Yakima OnRamp
Price Range: $850 – $1,000
Value Verdict: The choice for the enthusiast who wants their gear to look as good as their bike.
5. Saris Door County — The High-Tech Solution
If you are tired of reading hitch bike rack with ramp instructions and just want the technology to take over, the Saris Door County is in a league of its own. It is an electric elevator for your bikes.
Key Specifications & Practical Meaning:
-
Electric Motor: Uses the car’s power to lower the rack to the ground, so there is virtually no lifting or steep ramp angles.
-
7-pin connector: Plugs into your trailer light port to power the lift and provide integrated brake lights and turn signals.
-
Lobster claw style clamps: These grip the bike’s frame securely without requiring a specific tire size or fender clearance.
Expert Opinion: In my experience, this is the ultimate accessibility tool. For older riders or those with back injuries, the Saris Door County removes the physical barrier to cycling entirely. You roll the bike onto the trays at ground level and push a button. Just be aware that you need a functional 7-pin trailer plug—a standard 4-pin won’t provide the juice.
Customer Feedback Summary: Massive praise for the “cool factor” and the back-saving tech, but users remind newcomers to ensure their vehicle’s hitch is high enough to avoid scraping the motor on driveways.
-
✅ Zero-lifting required; total accessibility
-
✅ Includes lights for extra road safety
-
✅ Very secure frame-clamping system
-
❌ Requires a 7-pin trailer wiring harness
-
❌ High price and complex electronics
Price Range: $1,100 – $1,300
Value Verdict: A life-changing investment for those who physically cannot lift heavy e-bikes.
✨ Don’t Miss These Exclusive Deals!
🔍 Take your hauling game to the next level with these carefully selected products. Click on any highlighted item to check current pricing and availability. These tools will help you create authentic adventures your family will love!
Transformation Content: The “Zero-Strain” Loading Protocol
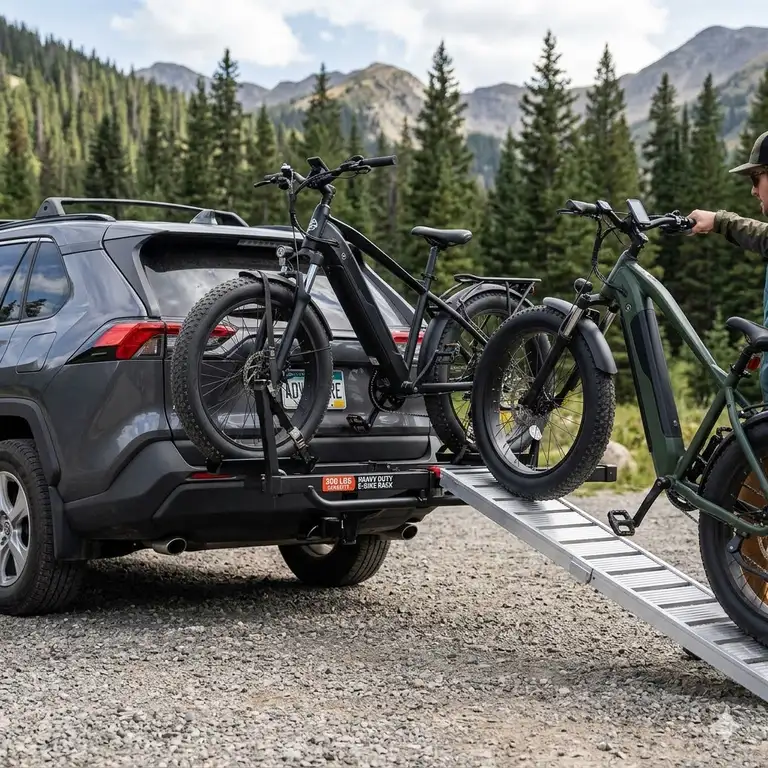
Loading a 75-pound e-bike onto a hitch rack isn’t just about strength; it’s about physics. Most people approach the ramp and try to “power” the bike up, which often leads to the front wheel twisting or the bike tipping toward the car. Here is the expert-approved, step-by-step optimization for a stress-free load:
-
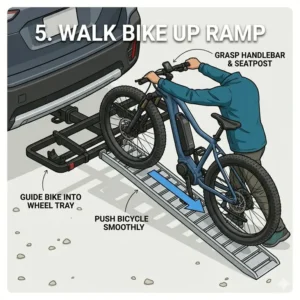
The “Walk-Beside” Method: Do not stand behind the bike. Stand on the side of the bike opposite the car. This gives you a clear view of the ramp and ensures that if the bike tips, it falls away from your vehicle’s paint.
-
Power-Assist Hack: If your e-bike has a “Walk Mode” (most 2026 models do), use it! This small motor assistance will drive the bike up the ramp while you simply guide the handlebars. This turns a 70-pound lift into a 5-pound steering task.
-
The Second-Bike Shuffle: Always load the heaviest bike closest to the vehicle. This reduces the leverage (torque) on your hitch receiver and keeps the center of gravity stable.
-
Ramp Storage Check: Before you pull away, double-check that the ramp is not just “resting” in its tray but is clicked into its locking pins. I’ve seen many $100 ramps lost on the highway because of a missed latch.
-
Pedal Placement: Rotate the pedals so the “inside” pedal (closest to the car) is facing forward. This prevents the pedal from striking the rack or the car as you roll the bike into its final position.
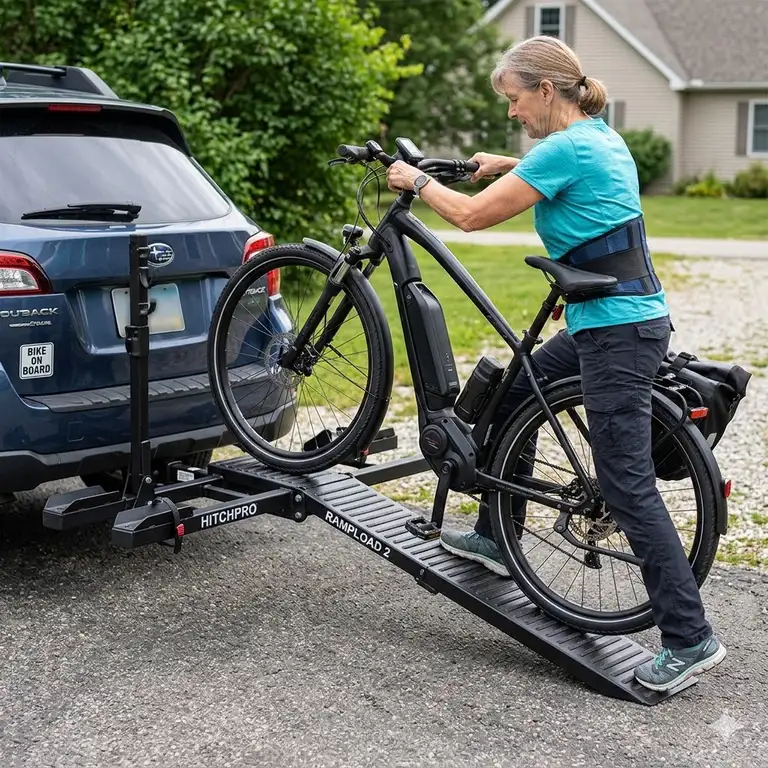
Case Study: The Weekend Warrior’s Dilemma
Meet “Jim,” a 62-year-old cyclist who recently upgraded to a heavy 2026 Trek Allant+ e-bike. At 72 lbs, Jim found that he was riding less because the thought of lifting the bike onto his old hanging rack was exhausting. He was on the verge of selling the bike.
Jim switched to a hitch bike rack with ramp instructions (specifically the Yakima OnRamp). Here’s the transformation:
-
Time Savings: Loading used to take Jim 15 minutes of struggling and sweating. With the ramp and the “Walk Mode” trick, he now loads in under 3 minutes.
-
Physical Health: No more lower back twinges. By using the ramp, he eliminates the vertical lift entirely.
-
Confidence: Because the Yakima is lower to the ground and the ramp is secure, Jim now travels to trails 50 miles away, whereas before he only rode in his neighborhood.
The Lesson: The right equipment doesn’t just transport your bike; it expands your world. For Jim, the ramp wasn’t an “accessory”—it was the key to continuing his hobby as he aged.
How to Choose Your Loading Geometry
When looking at a hitch bike rack with ramp instructions, the most important factor isn’t the color or the brand—it’s the Ramp-to-Ground Angle.
If you drive a lifted truck (like a Ford F-150 with a leveling kit), a short 30-inch ramp will create a very steep incline. This makes it difficult to push the bike up and increases the risk of the bike “bottoming out” where the ramp meets the rack. For high-clearance vehicles, you should prioritize racks with telescoping ramps like the Thule or Kuat.
Conversely, if you drive a sedan or a low-profile crossover, a standard fixed-length ramp is perfectly fine. You also need to consider the Tire Width Compatibility. As of 2026, “mid-fat” tires (2.8 to 3.2 inches) are the industry standard for e-MTBs. Ensure your ramp has a “channel” width of at least 3.5 inches to allow for tire squish and slight steering wobbles during the climb.
Tongue Weight vs. Total Capacity: The Math You Can’t Ignore
Many people see a rack rated for “120 lbs” and assume they are good to go. However, you must check your vehicle’s Tongue Weight Capacity. This is the amount of vertical pressure your hitch can handle.
In a hitch bike rack with ramp instructions context, you aren’t just calculating the weight of the bikes, but the weight of the rack plus the leverage.
A common formula used by engineers is:
If your total is 180 lbs, and your car is a small compact with a Class 1 hitch (limited to 200 lbs tongue weight), you are pushing the safety limits. In 2026, most mid-sized SUVs have Class 3 hitches with a 350-500 lb limit, which is the “Goldilocks zone” for heavy e-bike hauling. Always aim to stay under 80% of your tongue weight capacity for the best handling.
Aluminum vs. Steel Ramps — Long-Term Durability
The material of your ramp dictates more than just weight; it dictates the “flex” you feel while loading.
-
Aluminum Ramps: These are the most common in 2026. They are rust-proof and light. However, cheaper aluminum ramps can “bounce” when a 75-lb bike is halfway up. This bounce can be unnerving. If you go aluminum, look for “extruded” designs which are stiffer.
-
Steel Ramps: Occasionally found on budget models or heavy-duty motorcycle/e-bike hybrids. They are rock-solid with zero flex, but they are heavy and prone to rust if the powder coating chips.
In my experience, a high-quality aluminum ramp with a textured “grip” surface is the superior choice. The grip is vital because, in 2026, many e-bike tires use harder rubber compounds for longevity, which can be slippery on smooth metal when wet.
Common Mistakes: Why Most Ramps “Fail” (and how to fix it)
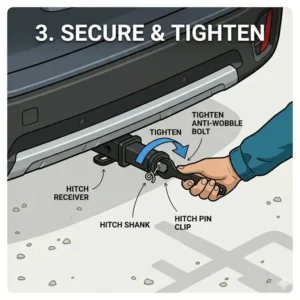
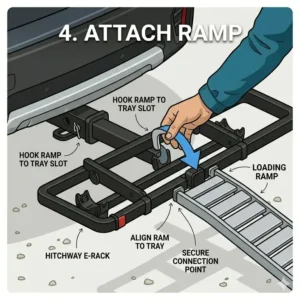
The most common “failure” isn’t the ramp breaking; it’s the ramp detaching during use. This almost always happens because the user didn’t ensure the “tongue” of the ramp was fully seated in the rack’s tray.
The Fix: Always apply a small amount of downward pressure on the top of the ramp before you bring the bike over. If the ramp wiggles, it’s not seated.
Another mistake is over-steering. When pushing a bike up a narrow ramp, beginners often try to steer the front wheel perfectly. Instead, focus on the rear wheel. If the rear wheel is centered on the ramp, the front will naturally follow. If you try to micro-manage the handlebars, you’ll likely zig-zag and fall off the edge.
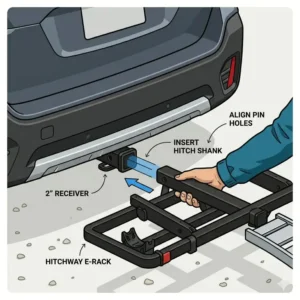
Receiver Compatibility: 1.25″ vs 2″ Hitches
Before you buy a hitch bike rack with ramp instructions, you must look under your bumper.
-
2-inch Receivers: These are the standard for any heavy-duty e-bike rack. They offer much better lateral stability. If you are hauling two 60-lb bikes, a 2-inch receiver is non-negotiable.
-
1.25-inch Receivers: These are common on smaller cars like the Tesla Model 3 or Honda Civic. While some ramp-equipped racks (like the Yakima OnRamp) come in this size, they often have lower weight limits.
Expert Advice: If your car only has a 1.25-inch hitch, do not use a “2-inch adapter” to fit a larger rack. This extends the distance of the weight from the car, effectively doubling the torque on your hitch and potentially damaging your vehicle’s frame.
Security Features: Protecting Your 2026 Investment
With e-bikes often costing upwards of $5,000 in 2026, the security features of your rack are as important as the ramp. Look for:
-
Hitch Pins with Integrated Locks: This prevents someone from simply pulling the pin and taking the entire rack (and bikes) in seconds.
-
Steel-Core Cables: Standard plastic-coated cables are easily cut with hand tools. Brands like Kuat and Thule are now using braided steel with hardened cores.
-
Alarm Integration: Some 2026 aftermarket racks now feature “tilt sensors” that sync with your phone, alerting you if someone is vibrating or tilting the rack while you are inside a coffee shop.
While no lock is 100% “theft-proof,” the goal is to make your setup more difficult than the one next to it.
Off-Road vs. On-Road Ramp Considerations
Are you a “pavement only” rider or a mountain biker? The vibrations of a washboard gravel road are significantly more destructive than highway miles.
If you plan on taking your hitch bike rack with ramp instructions off-road, you need a rack that has an Internal Tensioning System. This is a mechanism (like Yakima’s SpeedKnob or Thule’s AutoAttach) that expands inside the hitch to stop the rack from bouncing.
Ramps that are stored externally can also rattle loudly on dirt roads. If you value a quiet ride, choose a rack where the ramp is sandwiched tightly within the frame or stored inside the vehicle.
Long-Term Maintenance: Keeping the Ramp Smooth
A ramp that sticks or jams is a safety hazard. Because these ramps are located in the “low-pressure zone” behind your car, they get covered in road salt, grime, and dust.
-
Monthly Clean: Spray the telescoping joints with water and a mild detergent.
-
Dry Lubricant: Never use grease or WD-40 on your ramp slides; it attracts grit and creates a grinding paste. Instead, use a Teflon-based dry lube. This keeps the sliding action smooth without the mess.
-
Bolt Check: The pivot points on folding ramps are under high stress. Check them every six months to ensure the nylon lock nuts haven’t vibrated loose.
✨ Don’t Miss These Exclusive Deals!
🔍 Ready to hit the road? Take your adventure to the next level with these carefully selected products. Click on any highlighted item to check current pricing and availability. These tools are the key to a stress-free, authentic cycling experience for you and your family!
Conclusion
Choosing the right hitch bike rack with ramp instructions is about more than just checking specs; it’s about ensuring that your hobby remains a joy rather than a chore. In 2026, as bikes get smarter and heavier, our gear must keep pace. From the tech-heavy Saris Door County to the rugged Hollywood Racks Destination E, there is a solution for every budget and every back.
Remember to prioritize your vehicle’s tongue weight, use the “Walk Mode” on your e-bike to save your muscles, and always double-check your security locks. With the right ramp system, the only thing you’ll need to focus on is the trail ahead.
FAQs
❓ Can I use a ramp with a hanging-style hitch rack?
✅ No. Hanging racks require you to lift the bike by the frame onto two arms. Ramps only work with “Platform” or “Tray” style racks where the wheels sit on a solid base…
❓ Does the ramp work for bikes with fat tires?
✅ Most modern 2026 ramps are designed for tires up to 3 inches. If you have 4 or 5-inch fat tires, you specifically need the Kuat NV 2.0 ramp or the Hollywood Racks Destination E…
❓ Are ramps universal between different brands?
✅ Generally, no. Each brand uses a specific attachment point (hooks, slots, or pins) that is proprietary to their tray design. It is safest to use the ramp designed for your specific rack…
❓ Will a ramp work on a vehicle with a spare tire on the back?
✅ You will likely need a Hitch Extender. The spare tire on vehicles like the Jeep Wrangler often blocks the bike closest to the car, and the ramp may not clear the tire…
❓ Is it safe to leave the ramp attached while driving?
✅ Absolutely not. Ramps are loading tools, not structural components. They must be removed or stowed in their designated locking cradles before the vehicle moves to avoid road hazards…
Recommended for You
- 7 Best Hitch Bike Rack With Ramp For Step Thru Bikes in 2026: Epic Guide
- 7 Best ebike hitch rack with ramp for fat tire: 2026 Expert Guide
- Aluminum Hitch Bike Rack with Ramp: 7 Best Heavy-Duty Picks for 2026
Disclaimer: This article contains affiliate links. As an Amazon Associate, I earn from qualifying purchases. If you purchase products through these links, we may earn a small commission at no additional cost to you.
✨ Found this helpful? Share it with your friends! 💬🤗