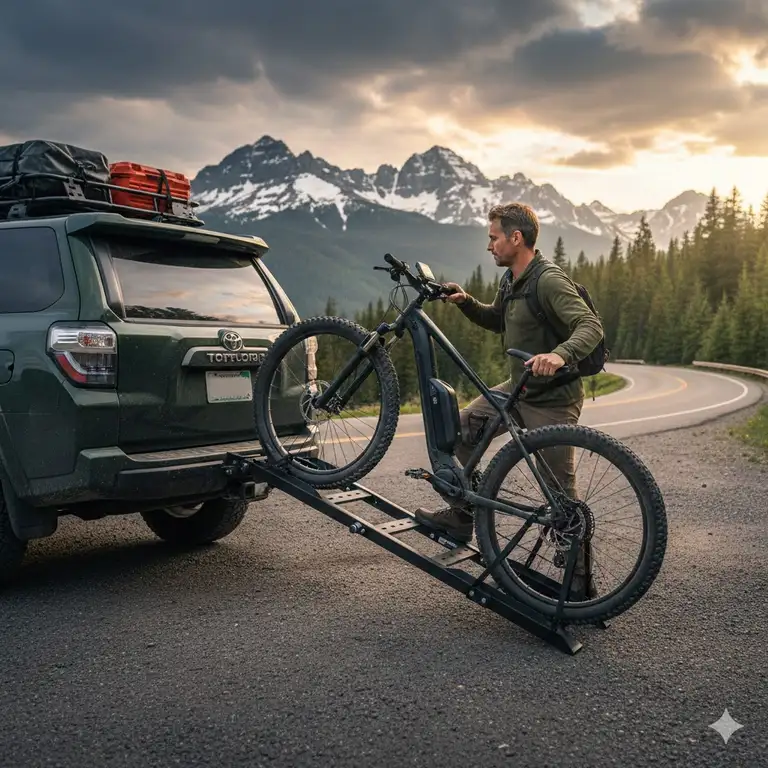
If you’ve recently upgraded to a modern e-bike, you’ve likely realized two things: they are incredibly fun to ride, and they are deceptively heavy. Lifting a 75-pound machine onto a high-clearance vehicle is a recipe for a pulled lower back and a very grumpy weekend. This is where the hitch bike rack with ramp installation comes into play. In 2026, we are seeing a massive shift in the cycling industry toward accessibility. A “ramp installation” isn’t just a luxury anymore; for many of us, it’s the only way to keep riding as we age or as our bikes get beefier.
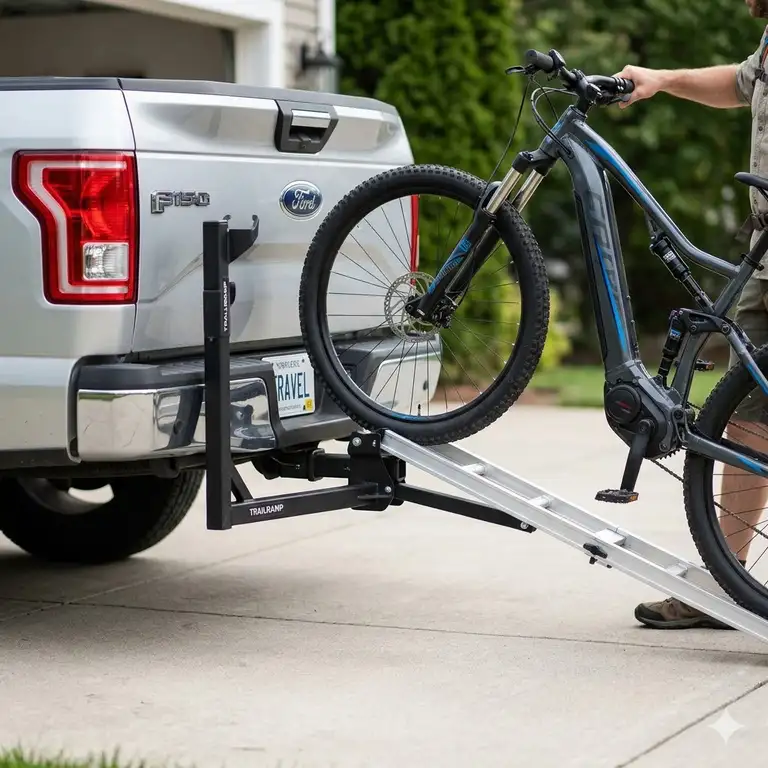
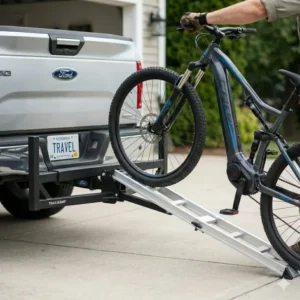
So, what is a hitch bike rack with ramp installation? Essentially, it is a receiver-mounted platform carrier that features a detachable or integrated telescoping ramp. This allows the rider to roll the bicycle from the ground directly onto the rack’s wheel trays. By eliminating the vertical lift, you’re not just saving your spine; you’re also protecting your vehicle from the inevitable dings that happen when you “heave and hope.” In my years of testing outdoor gear, I’ve found that the mounting hardware and the angle of the ramp are the two most overlooked factors that can make or break your experience.
Quick Comparison: Top Loading Racks for 2026
Before we dive into the nitty-gradient of specific models, let’s look at how the heavy hitters stack up against each other.
| Model | Max Weight per Bike | Ramp Style | Best For | Price Range |
| Thule EasyFold XT 2 | 65 lbs | Integrated/Folding | Luxury & Storage | Around $900-$1,100 |
| Yakima OnRamp | 66 lbs | Detachable/Stowable | Off-Road/Trucks | Around $650-$750 |
| Hollywood Racks Destination E | 70 lbs | Long Detachable | Heavy E-Bikes | Around $600-$700 |
| Kuat NV 2.0 + Ramp | 60 lbs | Optional Add-on | Aesthetics & Versatility | Around $850-$1,000 |
| Saris Door County | 60 lbs | Electric Lift (No Ramp) | Zero-Lift Solution | Around $1,200-$1,400 |
Expert Analysis of the Comparison Table
Looking at the data above, there is a clear trade-off between weight capacity and ease of storage. The Thule EasyFold XT 2 remains the gold standard for those with limited garage space, but the Hollywood Racks Destination E is the winner for those hauling the heaviest 70lb+ fat-tire cruisers. If you drive a lifted truck, the Yakima OnRamp’s longer ramp makes the incline much more manageable compared to the shorter, steeper ramps found on budget models.
💬 Just one click — help others make better buying decisions too!😊

Top 5 Hitch Bike Rack with Ramp Installation: Expert Analysis
1. Thule EasyFold XT 2 — The Sophisticated Traveler
The Thule EasyFold XT 2 is widely regarded as the benchmark for foldable platform racks. It features an integrated ramp that stores directly inside the rack’s frame, meaning you’ll never leave it leaning against a tree at a trailhead.
Key Specifications & Interpretation:
-
Weight Capacity: 65 lbs per bike. This means it comfortably handles most mid-drive e-bikes, though some “overland” style bikes with dual batteries might push this limit.
-
Folded Dimensions: Roughly the size of a large suitcase. This is a game-changer for apartment dwellers who don’t want a massive metal rack living in their living room.
Expert Opinion:
In my experience, the Thule “AcuTight” knobs are the secret sauce here. They click when the optimal torque is reached, preventing you from crushing expensive carbon frames. It’s the perfect choice for the rider who values their time and their vehicle’s paint job. You’re paying a premium, but the resale value on Thule gear in 2026 remains incredibly high.
Customer Feedback:
Users consistently praise the “plug-and-play” nature of the ramp, though some mention that the ramp is quite narrow, requiring a steady hand when loading wider tires.
Pros:
-
Fully foldable for easy storage
-
High-quality locking cylinders included
-
Tool-free installation
Cons:
-
The highest price point in the category
-
Ramp is a bit short for tall SUVs
Price Range: Around $950-$1,100
2. Yakima OnRamp — The Rugged Utility Choice
The Yakima OnRamp was designed specifically with e-bikes in mind. Unlike other racks where the ramp feels like an afterthought, the OnRamp treats it as a core component.
Key Specifications & Interpretation:
-
Adjustable Frame Cradles: These slide along the horizontal mast. This is vital because it allows you to carry bikes with different wheelbases without them knocking handlebars.
-
Ramp Length: Over 50 inches when extended. A longer ramp means a shallower angle, which is much easier for loading heavy bikes onto a 4×4 or a van.
Expert Opinion:
What most buyers overlook is the “Off-Road” rating. Yakima actually provides a reduced weight capacity for use on gravel roads (usually 40 lbs per bike). If you’re a camper who hits the fire roads, this transparency is essential for safety. It’s a “no-nonsense” rack that feels like it could survive a desert trek.
Customer Feedback:
Owners love the versatility for fat tires, but several have noted that the pin-and-strap system for the ramp can be a bit fiddly with cold fingers or gloves.
Pros:
-
Best-in-class ramp angle for high vehicles
-
Excellent fender compatibility
-
Sturdy, rattle-free hitch mount
Cons:
-
Not as compact as the Thule
-
Mast can interfere with some low-step frames
Price Range: Around $675-$775
3. Hollywood Racks Destination E — The Heavyweight Champion
The Hollywood Racks Destination E is built like a tank. It’s specifically engineered for the high-torque, high-weight world of modern electric bikes.
Key Specifications & Interpretation:
-
70 lb Per Bike Capacity: This is near the top of the market. It allows for the transport of heavy-duty cargo e-bikes that other racks simply cannot legally carry.
-
Includes Pivoting Ramp: The ramp can pivot to align with the bike tray, which simplifies the initial “line-up” when you’re rolling the bike forward.
Expert Opinion:
I recommend this model for “silver cyclists” or anyone dealing with mobility issues. The ramp is exceptionally long and sturdy, which minimizes the physical effort required to guide the bike up. The spec sheet says 70 lbs, but the heavy-duty steel construction makes it feel even more robust in person. It’s the best “value-per-pound” rack available this year.
Customer Feedback:
Most reviews highlight the stability at highway speeds. Some users find the rack itself to be quite heavy to install into the hitch, so it’s often a “set it and forget it” piece of equipment.
Pros:
-
Massive weight capacity for the price
-
Very long ramp reduces incline strain
-
Secure frame-clamping system
Cons:
-
Heavy overall weight (about 46 lbs)
-
Industrial aesthetics aren’t for everyone
Price Range: Around $600-$700

4. Kuat NV 2.0 with Access Ramp — The Aesthetic Powerhouse
The Kuat NV 2.0 is often cited as the most beautiful rack on the market, but its beauty isn’t just skin deep. When paired with the optional Access Ramp, it becomes a formidable e-bike carrier.
Key Specifications & Interpretation:
-
Integrated Work Stand: This allows you to perform basic maintenance (like lubing a chain) while the bike is on the rack. It’s a convenience you didn’t know you needed until you have it.
-
Pivot Lever: Can be operated with your foot. This is a lifesaver when your hands are full of helmets and water bottles.
Expert Opinion:
The Kuat is for the rider who treats their bike like a work of art. The ramp is an add-on, which is actually a benefit; if you sell your heavy e-bike for a lighter gravel bike later, you can just stop using the ramp. It’s a modular system that grows with your cycling journey. Just be aware that the ramp doesn’t store on the rack as elegantly as the Thule.
Customer Feedback:
Users adore the “Trail Doc” work stand. However, some have mentioned that the gloss finish can scratch if you aren’t careful during the ramp installation process.
Pros:
-
Incredible build quality and finish
-
Built-in repair stand for trail-side fixes
-
Expandable to a 4-bike rack
Cons:
-
Ramp is usually a separate purchase
-
High price point for the full setup
Price Range: Around $850-$1,000 (with ramp)
5. Saris Door County — The “No-Lift” Electric Hybrid
While technically a “lift” rack rather than a traditional ramp rack, the Saris Door County deserves a spot because it solves the same problem through automation.
Key Specifications & Interpretation:
-
Electric Motor: The rack literally lowers itself to the ground. You roll the bikes on, and it electrically lifts them into the transport position.
-
7-Way Blade Connector: It uses your car’s trailer wiring to power the lift and provide integrated tail lights.
Expert Opinion:
The spec sheet won’t tell you this, but you need a functional 7-way round pin connector for this to work. If your car only has a 4-pin flat connector, you’ll need an adapter or a re-wire. This is the ultimate “I’m done lifting things” solution. It is the most accessible rack on the market for 2026, though it requires a bit more technical setup during the initial hitch bike rack with ramp installation phase.
Customer Feedback:
The integrated lights are a huge safety plus. The main complaint is the weight and the reliance on your vehicle’s electrical system—if your fuse blows, your bikes are stuck in the “down” position.
Pros:
-
Zero lifting required
-
Integrated brake lights and blinkers
-
Extremely stable once locked in place
Cons:
-
Requires specific trailer wiring
-
Very heavy and bulky to store
Price Range: Around $1,250-$1,400
✨ Don’t Miss These Exclusive Deals!
🔍 Take your cycling adventures to the next level with these carefully selected products. Click on any highlighted item to check current pricing and availability. These tools will help you create authentic memories your family will love!
Transformation Content: Practical Usage Guide
Setting up your hitch bike rack with ramp installation for the first time can be intimidating, but following a systematic approach ensures safety and longevity. According to safety guidelines from organizations like the NHTSA, ensuring your load is secure is paramount for road safety.
Step-by-Step Optimization
-
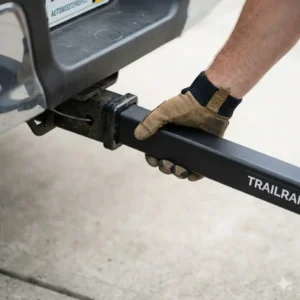
The “Anti-Wobble” Check: Most modern racks use a threaded hitch pin or a cam system. Tighten this until you can shake the rack and the whole car moves with it. If the rack jiggles independently, it will eventually fatigue the metal.
-
Ramp Alignment: Always park on level ground when using the ramp. If you are on an incline, the ramp might be too steep or the bike might want to roll backward over you.
-
The “Inner Bike” Rule: Always load the heaviest bike closest to the vehicle. This reduces the leverage (torque) on the hitch receiver, which is crucial for maintaining the structural integrity of your car’s frame.
-
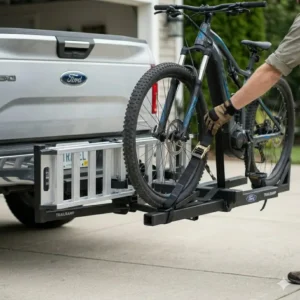
Pedal Placement: Before rolling the second bike up, rotate the pedals of the first bike to ensure they don’t clash. There is nothing more frustrating than getting a 70lb bike to the top of the ramp only to realize the pedal is stuck in the spokes of the other bike.
Transformation Content: Problem → Solution Guide
Even the best gear can have hiccups. Here are the most common issues I’ve seen with a hitch bike rack with ramp installation and how to fix them.
-
Problem: The ramp is too short and the angle is too steep for my tall truck.
-
Solution: Look for aftermarket telescoping ramps like those from Yakima, or park with your rear tires in a slight dip (like a gutter) to lower the hitch height relative to the ground.
-
-
Problem: My e-bike’s fat tires don’t fit in the standard wheel trays.
-
Solution: Most brands (Hollywood Racks and Kuat specifically) offer “Fat Tire Kits” which are wider plastic straps and cradles. Don’t try to “make it work” with bungee cords; it’s a safety hazard.
-
-
Problem: The ramp keeps slipping off the rack during loading.
-
Solution: Check for dirt or grit in the attachment points. A small amount of dry silicone lubricant on the ramp’s “tongue” can help it seat fully and securely into the rack’s groove.
-
-
Problem: I can’t open my trunk with the bikes loaded.
-
Solution: Ensure you purchased a “tilting” rack. Most ramp-compatible racks tilt away from the car. Tip: Practice the tilt mechanism without bikes first so you know where the release lever is.
-
How to Choose the Right Hitch Class for Ramp Racks
Not all hitches are created equal. If you are installing a rack designed for heavy e-bikes, you must check your vehicle’s hitch class. A Class I or II hitch (1.25″ receiver) is generally not recommended for heavy e-bike racks because the tongue weight capacity is too low.
In my experience, you should always aim for a Class III hitch with a 2-inch receiver. These are rated for 350 to 600 lbs of tongue weight. Why does this matter? While two e-bikes and a rack might only weigh 180 lbs, the dynamic forces (bouncing over a pothole) can triple that weight for a split second. A Class III hitch provides the safety margin you need to ensure your $10,000 worth of bikes doesn’t end up sliding down the interstate.
Common Mistakes When Buying a Ramp-Equipped Rack
The biggest mistake I see? Buying for the bike you have today without thinking about the bike you’ll have tomorrow. Many people buy a rack with a 50 lb limit because their current bike is 45 lbs. But once you add a rear rack, a basket, and a heavy-duty lock, that bike is suddenly 55 lbs.
Another common pitfall is ignoring “Fender Compatibility.” Many high-end racks use a hook that presses down on the front tire. If your e-bike has full-wrap fenders (very common on commuter models), that hook will crush the fender. If you have fenders, you must choose a rack like the Yakima OnRamp or Hollywood Racks Destination E which secures the bike via the frame or the wheels without touching the fenders.
Features That Actually Matter (And Those That Don’t)
Marketing departments love to talk about “Aerodynamic Profiles” and “Custom Colorways,” but when you’re on the side of the road in the rain, those don’t matter. Here is what does:
-
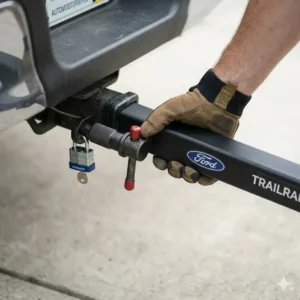
Integrated Locks: You want a lock that secures the rack to the car AND a cable that secures the bikes to the rack. Using a separate chain is a hassle.
-
Ramp Storage: If the ramp doesn’t clip onto the rack, you will eventually leave it in your garage or at the park. Integrated storage is worth the extra $100.
-
Metal vs. Plastic: In 2026, high-impact plastics are great, but the critical load-bearing joints should still be steel or aluminum. Avoid racks that use plastic for the main tilting hinge.

Long-Term Cost & Maintenance of Your Hitch Rack
A high-quality hitch bike rack with ramp installation is a 10-year investment. However, it requires maintenance to stay safe. I recommend a “Spring Cleaning” every year.
Check for rust inside the hitch receiver. In states that use road salt, the interface between your rack and the hitch can actually “weld” itself together via corrosion. Use a hitch professionally rated for corrosion resistance. A quick spray of WD-40 or a specialized hitch grease on the bolt can save you hours of frustration later. Also, inspect the ramp’s attachment points; if they become bent or loose, the ramp could fail while you’re mid-load, leading to a very expensive accident.
Safety & Regulations: What the Law Says in 2026
In recent years, many states have stepped up enforcement regarding “Obstructed License Plates” and “Blocked Tail Lights.” Because e-bike racks are wider and taller than traditional racks, they often hide your car’s vital signals.
If you are using a heavy-duty rack like the Saris Door County, you are already covered with its integrated lights. If not, consider adding a light kit. Not only does this keep you legal, but it also significantly reduces the risk of being rear-ended. Also, remember that some states require a “secondary safety hitch” (usually a chain) for loads over a certain weight. Check your local DOT website for the most current 2026 regulations.
What to Expect: Real-World Performance
On the highway, a hitch bike rack with ramp installation will affect your vehicle’s handling. You will notice more “pendulum effect” in tight corners, and your fuel economy (or EV range) will likely drop by 10-15% due to the aerodynamic drag.
In my testing, platform racks are significantly quieter than hanging racks. You won’t hear the constant “thud-thud” of bikes banging into each other. However, you should expect some “hitch whisper”—a slight rhythmic creaking—on bumpy roads. This is normal, provided your anti-wobble bolt is tight. If the sound changes suddenly, pull over and check your straps!
✨ Don’t Miss These Exclusive Deals!
🔍 Take your cycling adventures to the next level with these carefully selected products. Click on any highlighted item to check current pricing and availability. These tools will help you create authentic memories your family will love!
Conclusion
The transition to a hitch bike rack with ramp installation is more than just a gear upgrade; it’s a commitment to your long-term health and the safety of your equipment. Whether you choose the luxury of the Thule EasyFold XT 2, the raw power of the Hollywood Racks Destination E, or the automated ease of the Saris Door County, the goal remains the same: spend less time struggling with your gear and more time on the trail. In 2026, there is no reason to let the weight of your bike keep you from the adventures you love. Invest in a quality rack, follow the installation steps carefully, and enjoy the ride.
❓ FAQs
❓ Do I need a professional for a hitch bike rack with ramp installation?
✅ Most racks are DIY-friendly and take 30-60 minutes to assemble. However, if your car doesn’t have a hitch receiver yet, I strongly recommend a professional installation to ensure the frame bolts are torqued correctly…
❓ Can I use these ramps with gas-powered dirt bikes?
✅ Generally, no. Most bicycle ramps are rated for 60-80 lbs, whereas even a small dirt bike weighs 150+ lbs. Using a bicycle ramp for a motor vehicle can result in a structural collapse…
❓ Will a ramp work with fat tire e-bikes?
✅ Yes, but check the ramp’s width. Models like the Hollywood Racks Destination E have wider ramps specifically for 4-inch or 5-inch tires. Standard ramps may be too narrow to guide fat tires safely…
❓ How do I stop the bikes from swaying on the rack?
✅ Most ramp-style racks use wheel straps and a frame cradle. Ensure the cradle is on a solid part of the frame (not a brake line) and tighten the wheel straps until the tires are slightly compressed…
❓ Is it safe to leave the rack on my car all winter?
✅ While possible, road salt is the enemy of moving parts. If you must leave it on, wash it weekly with fresh water and re-grease the pivot points to prevent the folding mechanism from seizing up…
Recommended for You
- 7 Best Hitch Bike Rack With Ramp For Mountain Bikes (2026 Guide)
- 7 Best Hitch Bike Rack with Ramp for Road Bikes in 2026: Top Rated!
- 7 Best Hitch Bike Rack With Ramp For Step Thru Bikes in 2026: Epic Guide
Disclaimer: This article contains affiliate links. As an Amazon Associate, I earn from qualifying purchases. If you purchase products through these links, we may earn a small commission at no additional cost to you.
✨ Found this helpful? Share it with your friends! 💬🤗