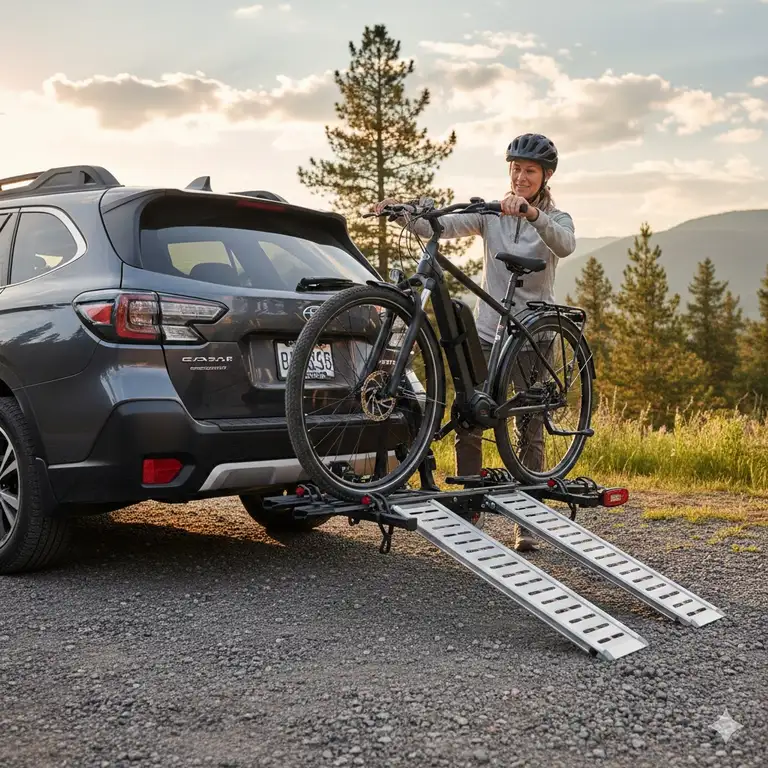
Welcome, fellow electric bike (e bike) enthusiasts! I’m here as your expert guide, ready to dive deep into a topic that elevates every e bike experience: knowing exactly how to install rear rack on electric bike. For many, the step up to an e bike transforms their commute or weekend explorations, offering a boost that makes carrying gear easier. However, without a proper rear rack, that cargo capacity remains untapped. Consequently, learning to install a rear rack on electric bike models is one of the most critical upgrades for any serious rider.
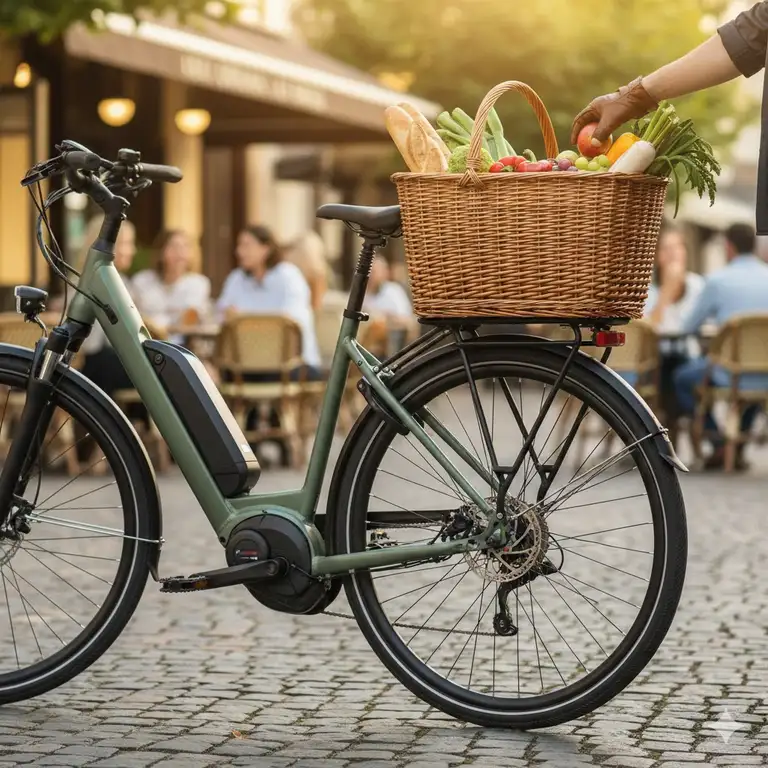
This isn’t just about slapping some metal onto your frame; it’s about understanding compatibility, ensuring structural integrity, and choosing the perfect rack to handle the unique demands of an e bike—namely, higher speeds and, often, heavier battery weight. Whether you’re looking to carry groceries, secure a battery-powered cooler, or attach panniers for a long-distance tour, this comprehensive guide has you covered.
✨Was this helpful? Spread the word! 🚀
We’ll be exploring the specific requirements for different types of electric bikes, from fat-tire mountain e bikes to sleek city commuters. Furthermore, I’ll walk you through a detailed analysis of the seven best, most reliable rear racks available on Amazon right now, complete with technical specs and genuine customer feedback, so you can confidently pick the right one.
🧐 Quick Comparison: Rear Racks vs. Alternative Cargo Solutions
Before we look at the specific products, it’s worth noting why a dedicated rear rack (or rear cargo rack for electric bike models) is almost always the superior choice over alternatives like front baskets or backpacks when considering how to install rear rack on electric bike.
| Feature | Dedicated Rear Rack | Front Basket/Rack | Backpack/Messenger Bag |
| Cargo Capacity | Excellent (Up to 55 lbs/25 kg) | Good (Typically < 20 lbs) | Fair (Limited by personal comfort) |
| Weight Distribution | Optimal (Low and centered) | High and forward (Affects steering) | High on the body (Raises center of gravity) |
| E Bike Compatibility | High (Many mounting options) | Varies greatly; can obstruct headlight | Universal |
| Stability at Speed | High | Lower (Can feel ‘wobbly’ when full) | High |
| User Effort | Low (Bike carries the load) | Low (Bike carries the load) | High (Rider carries the load) |
A rear rack simply offers the best combination of load capacity, stability, and minimized impact on the e bike’s handling, especially crucial for installing a back rack on an e bike that moves faster than a traditional bicycle.
🥇 Top 7 E Bike Rear Racks: Expert Analysis from Amazon
Choosing the right component is the first, and arguably the most crucial, step in learning how to install rear rack on electric bike. The demands on an e bike rear rack are much higher than on a standard bike due to the extra weight and speed. Therefore, I’ve scoured the market to identify the most robust, reliable, and highly-rated racks. These are the workhorses that can handle the job, focusing on quality construction and verified rider satisfaction.
1. Topeak Super Tourist DX Disc Mount
This rack is often considered the gold standard for heavy-duty touring, making it an ideal choice for the powerful e bike. Its design is specifically tailored for bikes with disc brakes, providing extra clearance where traditional racks might interfere. The integrated MTX QuickTrack™ system allows for rapid attachment and removal of compatible Topeak bags and baskets, which is a major convenience for commuters.
-
Technical Specifications:
-
Material: 6061 T-6 hollow aluminum
-
Maximum Load Capacity: 57 lbs (26 kg)
-
Compatibility: 26 to 29-inch wheel sizes, works with non-disc brake bikes as well.
-
Added Features: Extra-long main beams to prevent pannier bag swing, integrated fender top.
-
-
Customer Review Analysis: Users frequently praise its rock-solid stability and the “incredibly handy QuickTrack system”. A common piece of feedback is that the install is straightforward, especially for mounting a rear rack on a bike without eyelets using the included P-clamps (though the DX model is for eyelets). The durability of the aluminum under heavy loads is a recurring theme.
-
Professional Applications: Ideal for high-mileage e bike commuters and long-distance touring. It’s the top choice for riders who need reliable pannier support.
-
Pros/Cons Analysis:
-
✅ Pros: Exceptionally high weight capacity; Patented QuickTrack system; Excellent disc brake clearance; Durable construction.
-
❌ Cons: Higher price point; QuickTrack system locks you into Topeak-specific bags unless using an adapter.
-
2. Planet Bike K.O.K. Rear Rack
The Planet Bike K.O.K. (Keep on Kicking) is a sturdy and reliable alternative, focusing on broad compatibility and ease of adjustment. It’s built with heat-treated aluminum for excellent strength-to-weight ratio and features an adjustable design, making it a strong contender for different e bike frame geometries.
-
Technical Specifications:
-
Material: 6061 T6 heat-treated aluminum
-
Maximum Load Capacity: 50 lbs (22.7 kg)
-
Compatibility: Adjustable to fit 26-inch, 27-inch, and 700c (29-inch) wheels.
-
Added Features: Included light/reflector mount, single bolt mounting design for easy alignment.
-
-
Customer Review Analysis: Riders appreciate its “universal fit and simple, secure mounting”. It’s a favorite for installing an e bike rear rack on frames with less conventional shapes. The most common positive note is its simplicity and reliability, though some mention that the hardware provided could be slightly sturdier for max-capacity loads.
-
Professional Applications: Excellent for general commuting, carrying school books, or moderate grocery runs. A fantastic all-around option for the mid-range electric bike rear carrier.
-
Pros/Cons Analysis:
-
✅ Pros: Very versatile and adjustable; Integrated light mount; Good capacity for daily use; Excellent value.
-
❌ Cons: Not specifically disc-brake optimized (though often works); Maximum capacity is slightly lower than the Topeak model.
-
3. Axiom Journey Universal Rack
Axiom specializes in robust cycling accessories, and the Axiom Journey Universal Rack is a testament to that. It’s designed to be universally compatible, using extra-long stays and a clever offset design that ensures proper fit on almost any bicycle frame, including many full-suspension models where a standard rack would fail. This is a crucial consideration for riders figuring out how to install a rear rack on an electric mountain bike.
-
Technical Specifications:
-
Material: Tubular 6061 aluminum
-
Maximum Load Capacity: 110 lbs (50 kg) – Note: This is an extremely high manufacturer rating, often exceeding the bike’s actual limit.
-
Compatibility: Universal design fits 26-inch to 29-inch wheels.
-
Added Features: Disc brake compatible, included stay extensions for awkward mounting points.
-
-
Customer Review Analysis: The 110-pound rating is frequently mentioned, though most customers use it well below that, noting the rack “feels absolutely bomb-proof”. Its disc-brake compatibility is a highlight, and the adjustable mounting hardware is key to its popularity for complex installations. Some users find the initial setup more time-consuming due to the number of adjustment options.
-
Professional Applications: Ideal for heavy-duty commercial use (e.g., delivery riders) or for off-road/overlanding e bike expeditions where absolute strength is paramount.
-
Pros/Cons Analysis:
-
✅ Pros: Industry-leading strength rating (50 kg); Highly versatile ‘universal’ fit; Excellent value for the strength.
-
❌ Cons: Installation can be slightly complex due to the multitude of adjustment points; Very wide platform.
-
4. Ibera PakRak Touring Carrier Plus+
The Ibera PakRak Touring Carrier Plus+ is another excellent choice that features its own proprietary quick-release bag system (PakRak Clip-On), offering a secure and integrated solution similar to Topeak’s, but often at a more budget-friendly price point. It’s a beautifully designed aluminum rack that manages to look sleek while maintaining high functionality.
-
Technical Specifications:
-
Material: TIG-welded, heat-treated aluminum
-
Maximum Load Capacity: 55 lbs (25 kg)
-
Compatibility: Adjustable fit for 26-inch, 27.5-inch, and 700c wheels.
-
Added Features: Side rails prevent pannier bags from rubbing on the rear wheel, ideal for installing a cargo rack on e bike.
-
-
Customer Review Analysis: Customers consistently praise the ease of use with the PakRak bags, stating the “click-and-go system is a game-changer” for daily commuting. Its slim profile is also a positive for many riders. The main drawback cited is that the proprietary system, like others, limits bag choice unless you use an adapter.
-
Professional Applications: A fantastic mid-range option for riders who need the convenience of a quick-attach bag system for commuting or light delivery work.
-
Pros/Cons Analysis:
-
✅ Pros: Lightweight yet strong; Integrated side bars for pannier protection; Excellent quick-release bag system.
-
❌ Cons: Relies on Ibera bags for full system integration; Can be slightly fiddly to adjust to unusual frame angles.
-
5. BV Bicycle Rear Rack Carrier
For the budget-conscious e bike owner, the BV Bicycle Rear Rack Carrier offers a compelling combination of features and price. It’s a straightforward, well-built rack that provides reliable service without unnecessary frills. It’s often the go-to when searching for an inexpensive but effective solution on how to install a rear rack on a bike without eyelets.
-
Technical Specifications:
-
Material: Aluminum alloy
-
Maximum Load Capacity: 50 lbs (22.7 kg)
-
Compatibility: Adjustable to fit 26-inch to 29-inch wheels.
-
Added Features: Side rails for pannier stability, fender top, and an integrated clamp for attaching a reflector or light.
-
-
Customer Review Analysis: Reviewers frequently highlight the “incredible value for the price” and its reliability for everyday loads. While it lacks proprietary quick-release systems, its standard design makes it compatible with almost all universal panniers. The assembly instructions are occasionally cited as being a bit minimal, a common issue with budget-friendly options.
-
Professional Applications: The perfect solution for students, occasional commuters, or those installing a back rack on an e bike for simple, light errands.
-
Pros/Cons Analysis:
-
✅ Pros: Excellent price point; Standard design for maximum pannier compatibility; Decent load capacity.
-
❌ Cons: Requires a separate bungee cord or strap system; No dedicated quick-release system; Hardware quality is standard, not premium.
-
6. Thule Tour Rack (Non-Traditional Mounting)
This is the non-traditional powerhouse. The Thule Tour Rack is engineered specifically for bikes without traditional mounting points, which is increasingly common on high-end carbon fiber e bikes or full-suspension e-MTB models. It uses Thule’s proprietary rubberized straps and a unique clamping system to attach securely to the seat stays and front fork, making it an excellent rear rack installation e bike option for frames lacking eyelets.
-
Technical Specifications:
-
Material: Aluminum and durable nylon
-
Maximum Load Capacity: 55 lbs (25 kg)
-
Compatibility: Mounts on almost any bike frame, including full-suspension and carbon.
-
Added Features: Patented attachment system, rubberized grip to protect the frame, included light loop.
-
-
Customer Review Analysis: Customers rave about its “miraculous ability to fit where others fail,” particularly on carbon frames where they fear clamp damage. The initial setup is described as more involved than a traditional bolt-on rack, but once installed, it is “surprisingly solid and trustworthy.” The only consistent critique is the premium price reflecting its unique engineering.
-
Professional Applications: The only realistic choice for high-end carbon e bikes or any e bike without rear eyelets where welding or drilling is not an option.
-
Pros/Cons Analysis:
-
✅ Pros: Universal fit on virtually any frame; Protects paint/frame with rubberized mounts; Exceptionally strong for a strap-based system.
-
❌ Cons: Premium price; Initial installation is more complex than bolt-on designs; It’s a non-permanent solution, which some riders dislike.
-
7. Old Man Mountain Elkhorn Rack
The Old Man Mountain Elkhorn Rack represents the premium, adventure-ready segment. Known for their extreme durability and exceptional off-road performance, Old Man Mountain (OMM) racks are frequently oversized to handle heavy loads and are designed to be run on either the front or rear of a bike, including over a rear fender. They are highly customizable and often utilized by riders who do bikepacking or severe off-pavement touring on their electric bikes.
-
Technical Specifications:
-
Material: 6061 Aluminum with stainless steel hardware
-
Maximum Load Capacity: 55 lbs (25 kg)
-
Compatibility: Fits 27.5-inch and 29-inch wheels. Can be adapted for thru-axles.
-
Added Features: Customizable mounting points, superior tie-down loops, designed for extreme off-road conditions.
-
-
Customer Review Analysis: The feedback is uniformly excellent, with one rider describing it as “the last rack I will ever buy.” Its overbuilt nature and secure, rattle-free performance are major highlights, even on the roughest terrain. It is the gold standard for installing rear rack on electric bike that sees regular trail use. The only downside cited is the high cost and the need for a specific fit kit for thru-axle installations.
-
Professional Applications: The ultimate choice for serious bikepacking, heavy expedition touring, and off-road e-MTB use where other racks would likely fail.
-
Pros/Cons Analysis:
-
✅ Pros: Extremely durable and stable; Highly adaptable; Excellent for off-road/trail use; USA-made quality.
-
❌ Cons: High-end price point; Thru-axle requires an additional fit kit; Overkill for simple city commuting.
-
✨ Don’t Miss These Exclusive Deals! 🔍
Take your e bike commuting to the next level with these carefully selected, high-performance rear racks. Click on any highlighted item like the Topeak Super Tourist DX Disc Mount or the heavy-duty Axiom Journey Universal Rack to check current pricing and availability on Amazon. The right rack is waiting to transform your ride! Click to see current deals! ⚡🛒
💬 Just one click – help others make better buying decisions too!😊
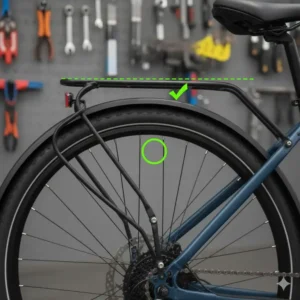
🛠️ Decoding E Bike Rear Rack Installation: A Step-by-Step Guide
Understanding the practical steps of how to install rear rack on electric bike is crucial. While every e bike and rack combo has slight differences, the core process remains consistent. Most high-quality e bikes, especially commuter or utility models, come with rack eyelets (threaded holes) on the frame near the rear axle and under the seat.
Phase 1: Preparation and Compatibility Check
Before you even touch a wrench, you must confirm two critical pieces of information. Skipping this step is the number one reason for frustrating installation delays.
1. Wheel Size and Frame Material
-
Wheel Size: Does your e bike have 26-inch, 27.5-inch, or 700c (29-inch) wheels? Most racks are adjustable, but ensuring the rack (like the Topeak Super Tourist DX Disc Mount) is rated for your wheel size prevents the rack from being angled too high or too low.
-
Frame Material & Eyelets: Most installations rely on pre-drilled rear rack mounts for e bike frames. If your frame is carbon fiber and lacks eyelets, you must use a non-traditional mounting system like the Thule Tour Rack to avoid crushing the carbon tubes. For steel or aluminum frames without eyelets, you’ll need P-Clamps or a quick-release mounting system.
2. Brake Type and Clearance
-
Disc Brakes: If your e bike has disc brakes, you need a disc-brake-compatible rack. The caliper and rotor require extra clearance, which standard racks do not provide. Racks like the Axiom Journey Universal Rack are specifically designed with an offset or raised mount to clear the caliper. Using a non-disc rack on a disc-brake bike will cause alignment issues and is a major rookie mistake.
-
Fender/Tire Clearance: Check the space between your tire and the lowest part of the rack platform. A common issue when you install rear rack on electric bike is the tire buzzing against the rack on bumpy ground. Always ensure at least 2 inches of clearance.
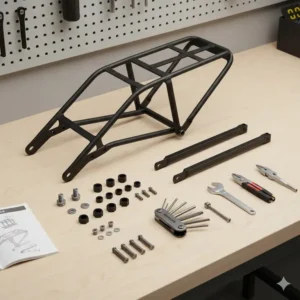
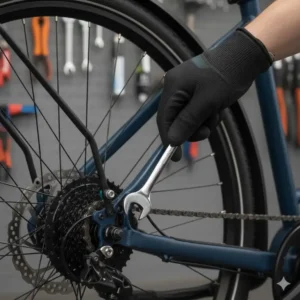
Phase 2: The Installation Process (Bolt-On Racks)
Assuming your e bike has the standard rack eyelets, here is the expert procedure.
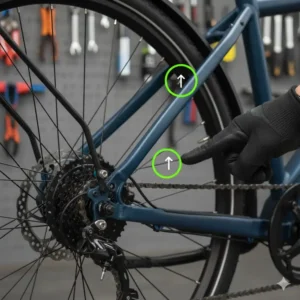
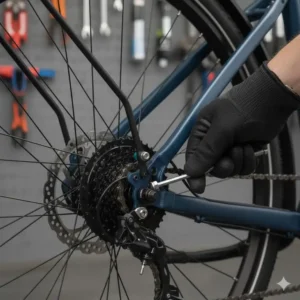
Step A: Attach the Lower Stays (The Feet)
-
Identify the Lower Eyelets: These are typically located on the rear dropouts, near the wheel axle.
-
Mount the Rack Feet: Place the rack’s feet against the frame’s eyelets. Use the provided M5 bolts. Do not tighten them fully yet; they should be loose enough to allow the rack to pivot up and down. Pro Tip: Use a small amount of blue threadlocker on these bolts to prevent them from vibrating loose over time, especially crucial for installing an e bike rear rack due to motor vibration.
Step B: Secure the Upper Stays (The Arms)
-
Align the Rack: Gently hold the rack so the top platform is level (horizontal) and centered over the rear wheel.
-
Attach to the Upper Mounts: The upper mounts are usually near the seat stay bridge, beneath the seat. Use the long, adjustable metal arms (the upper stays) provided with the rack. These should attach to the rack platform on one end and to the upper frame eyelets on the other.
-
Adjust for Perfect Fit: The arms, for models like the Planet Bike K.O.K. Rear Rack, are often adjustable in length or angle. Center the rack and adjust the length of the stays so they attach to the frame without undue stress or bending. If you do not have upper eyelets, this is where you would use P-Clamps (small metal clamps with rubber lining) to attach the stays to the seat tube.
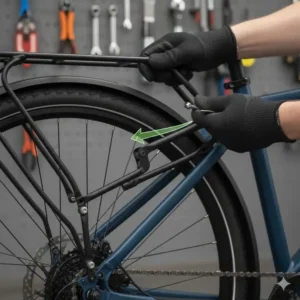
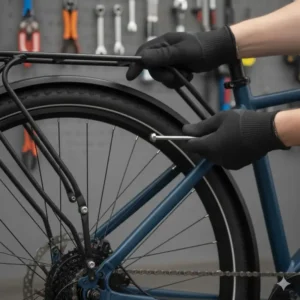
Step C: Final Tightening and Safety Check
-
Tighten the Upper Bolts: Once the rack is level and centered, fully tighten the bolts holding the upper stays to the frame and the rack platform.
-
Tighten the Lower Bolts: Go back to the lower mounting bolts and fully tighten them.
-
Wiggle Test: Give the entire rack a good, hard wiggle. It should feel absolutely secure with no play. If it wobbles, re-check all bolts. The most common error when you install rear rack on electric bike is uneven tension on the stays.
-
Light/Reflector Check: Attach your rear light or reflector to the dedicated mount on the back of the rack. Visibility is non-negotiable!
Phase 3: Specialty Installation (No Eyelets/Thru-Axles)
For more complex frame types, the installation changes:
-
No Eyelets (P-Clamps): Instead of bolting to the upper eyelets, rubber-lined P-clamps are used around the seat stays. The BV Bicycle Rear Rack Carrier often includes these for versatility. Important: Never over-tighten P-Clamps on lightweight or carbon frames.
-
Thru-Axle (OMM): Racks like the Old Man Mountain Elkhorn Rack require replacing your e bike’s standard thru-axle with a specialty Fit Kit axle that has mounting points for the rack stays. This provides the most secure attachment for off-road use but adds to the complexity and cost. This is the gold standard for stability for rear cargo rack for electric bike adventurers.
📊 Technical Deep Dive: E Bike Rear Rack Specification Matrix
When evaluating which rear rack installation e bike option is best for you, comparing the core specifications is essential. The following table provides a side-by-side technical breakdown of our top contenders.
| Product Model | Max. Load (Lbs/Kg) | Material | Disc-Brake Specific? | Quick-Attach System | Fits Wheel Sizes | Unique Feature for E Bike |
| Topeak Super Tourist DX Disc Mount | 57 lbs (26 kg) | 6061 Hollow Aluminum | ✅ Yes (Offset Stays) | MTX QuickTrack™ | 26-29 inches | Long beams minimize pannier heel strike. |
| Planet Bike K.O.K. Rear Rack | 50 lbs (22.7 kg) | 6061 T6 Aluminum | ❌ No (General) | ❌ No (Standard Platform) | 26-29 inches (Adjustable) | Highly adjustable height and angle. |
| Axiom Journey Universal Rack | 110 lbs (50 kg) | Tubular 6061 Aluminum | ✅ Yes (Disc Optimized) | ❌ No (Standard Platform) | 26-29 inches (Universal) | Highest load capacity for heavy batteries/cargo. |
| Ibera PakRak Touring Carrier Plus+ | 55 lbs (25 kg) | TIG-Welded Aluminum | ❌ No (General) | PakRak Clip-On | 26-29 inches (Adjustable) | Integrated side frames for pannier protection. |
| BV Bicycle Rear Rack Carrier | 50 lbs (22.7 kg) | Aluminum Alloy | ❌ No (General) | ❌ No (Standard Platform) | 26-29 inches (Adjustable) | Excellent budget-friendly option with included clamps. |
| Thule Tour Rack | 55 lbs (25 kg) | Aluminum/Nylon | ✅ Yes (Universal Mount) | ❌ No (Standard Platform) | Universal | Fits all frames—especially carbon and full-suspension. |
| Old Man Mountain Elkhorn Rack | 55 lbs (25 kg) | 6061 Aluminum | ✅ Yes (Thru-Axle Option) | ❌ No (Standard Platform) | 27.5-29 inches | Extremely durable for off-road and bikepacking use. |
⚖️ Budget vs. Premium: Finding the Right Value
The spectrum of rear racks for electric bikes is wide, ranging from budget-friendly options perfect for light loads to premium, over-engineered racks designed for extreme expeditions. Choosing the right one depends heavily on your planned use, and the concept of value is highly subjective.
Budget (Value Focus) – The 50 lb Crowd
Racks like the BV Bicycle Rear Rack Carrier excel here. They typically max out at around 50 pounds, are made of standard-gauge aluminum, and rely on traditional bolts and bungee cords for securing cargo. The value is found in their simplicity and low entry cost.
-
Best For: Casual riders, light commuters, city e bike rear carrier use, and those who only need to carry a battery bag or a small backpack.
-
Trade-offs: They may lack the integrated side frames (pannier protection) of the Ibera PakRak Touring Carrier Plus+ and may be less robust over very rough roads. Their hardware is functional but not designed for long-term abuse.
Mid-Range (Feature Focus) – The Quick-Release Warriors
This bracket includes racks like the Topeak Super Tourist DX Disc Mount and the Ibera PakRak Touring Carrier Plus+. These models invest in proprietary quick-release systems, integrated lighting mounts, and better clearance for disc brakes.
-
Best For: Dedicated e bike commuters who need to frequently attach and detach cargo (e.g., laptop bags, groceries) and appreciate the superior stability of a heavier-duty build.
-
Trade-offs: You often get locked into a specific bag ecosystem (e.g., MTX or PakRak), and the initial cost is higher than a standard rack.
Premium (Durability Focus) – The Expedition Giants
Racks such as the Axiom Journey Universal Rack and the Old Man Mountain Elkhorn Rack occupy this space. They feature extreme load ratings (up to 110 lbs, although you should never put that much on a bike) and specialized mounting systems (thru-axle compatibility, universal straps). They are built with thicker tubing and superior welding.
-
Best For: Bikepacking, e bike mountain biking (e-MTB), commercial delivery, or anyone whose frame lacks eyelets (the Thule Tour Rack).
-
Trade-offs: Significantly higher purchase price and potentially more complicated, customized installation procedures. However, the lifetime durability often justifies the initial cost.
| Comparison Point | Budget/Value Options | Mid-Range/Feature Options | Premium/Expedition Options |
| Typical Price Range | $\$$ | $$$$ | $$$$ |
| Load Security Method | Bungee cords, basic straps | Proprietary Quick-Release (QR) | High-strength tie-down points |
| Pannier Protection | None or basic side rails | Integrated, robust side bars | Dedicated, wide-stance framing |
| Ideal User | Casual, occasional use, students | Daily commuter, frequent cargo runs | Expedition touring, off-road, heavy loads |
| Key Advantage | Low initial cost; simple design | Ease of use; fast bag attachment | Superior stability; maximum durability |
| Representative Product | BV Bicycle Rear Rack Carrier | Topeak Super Tourist DX Disc Mount | Old Man Mountain Elkhorn Rack |
💡 Key Features and Benefits Comparison
When analyzing how to install rear rack on electric bike, it’s important to look beyond just the weight limit. Specific features impact your day-to-day riding experience significantly.
1. Quick-Release Systems (Feature: Convenience)
Proprietary quick-release systems, such as the MTX found on the Topeak Super Tourist DX Disc Mount, allow a rider to slide a compatible bag or basket onto the rack and lock it into place with a simple click. The convenience here is immense. Imagine arriving at the grocery store, quickly releasing your basket, filling it up, and locking it back onto your e bike rear carrier in seconds, all without struggling with hooks or straps.
-
Impact on User Experience: Cuts down on time and hassle. It also provides a level of security and rigidity that is difficult to achieve with simple bungee cords, ensuring your cargo stays put over rough terrain. This seamless integration is a major benefit for frequent commuters.
2. Disc Brake Specificity (Feature: Compatibility & Safety)
As mentioned, disc brake e bikes require racks with extended or offset mounting feet to clear the large brake caliper. Trying to force a standard rack onto a disc-equipped e bike is dangerous as it can damage the caliper or place the rack at a severe, unsafe angle. Disc-specific models like the Axiom Journey Universal Rack ensure the load is carried safely and level.
-
Impact on User Experience: Prevents damage to your expensive e bike components and ensures the rack is mounted correctly, which is paramount for safely carrying the load, especially on a heavy electric bike rear carrier.
3. Thru-Axle/Non-Traditional Mounting (Feature: Versatility & Strength)
For high-end or non-standard frames (e.g., carbon, full-suspension), a traditional bolt-on rack is impossible. The Thule Tour Rack’s clamping system or the Old Man Mountain Elkhorn Rack’s thru-axle solution becomes necessary.
-
Impact on User Experience: These specialized mounting solutions allow you to install a rack on a bike that would otherwise be unable to carry cargo, opening up bikepacking and touring options for performance e-MTBs and road e bikes. For riders of premium, non-traditional e bikes, this feature isn’t a benefit—it’s a necessity.
| Feature Type | Specific Benefit/Impact on User | Traditional Alternative | Product Example with Feature |
| QR System | Instant, secure bag attachment; rattle-free riding. | Bungee cords, manual straps, unstable hooks. | Ibera PakRak Touring Carrier Plus+ |
| Disc Brake Clearance | Safe, level mounting on disc-brake bikes; prevents component damage. | Rack sits crooked; forces the frame; unsafe. | Topeak Super Tourist DX Disc Mount |
| Pannier Rails | Keeps bags clear of the rear wheel/spokes. | Panniers swing into the wheel, causing friction and danger. | Planet Bike K.O.K. Rear Rack |
| High Load Rating | Capacity for heavier e bike batteries or substantial cargo. | Rack failure, bending, or breakage under heavy load. | Axiom Journey Universal Rack |
| Universal Mounting | Fits all frame types (carbon, full-suspension). | Cannot install a rack at all; frame damage risk. | Thule Tour Rack |
💡 Pro Tip on Load Capacity
While a rack like the Axiom Journey Universal Rack is rated for 110 lbs, never exceed the maximum weight capacity recommended by your e bike manufacturer. The frame, wheels, and spokes of your bicycle are typically the weakest links, not the rack itself. Always prioritize the bike’s limit when learning how to install rear rack on electric bike. For deeper research into bike component stress limits, you can often consult resources from engineering and safety standards bodies like ASTM or ISO.
🚲 Expanding Your E Bike’s Utility: Mounting a Rear Rack on a Bike Without Eyelets
This is one of the most frequently asked questions: “What if my commuter or electric bike lacks those little threaded holes (eyelets) on the frame?” This usually happens on entry-level, performance-oriented, or older bikes. Fortunately, manufacturers have solved this with two primary options when you need to install a rear rack on a bike without eyelets: P-clamps and proprietary universal mounting systems.
The P-Clamp Solution (Budget & Standard Racks)
P-clamps are simple metal bands, shaped like a ‘P’, with a rubber lining inside. They are typically included with many standard racks, such as the BV Bicycle Rear Rack Carrier.
-
Lower Mounts: The lower mounts (near the axle) are usually the biggest hurdle. If there are no eyelets here, the simplest solution is often a replacement quick-release skewer that has mounting points, or, less ideally, axle-mount clamps.
-
Upper Mounts: P-clamps are most commonly used here, attaching the upper stays to the bike’s seat stays. You simply clamp the P-clamp around the frame tube, and the bolt for the rack stay passes through the clamp’s hole.
-
Caveat: P-clamps are a solid budget solution for mounting a rear rack on a bike without eyelets, but they rely entirely on friction and clamping pressure. They are not recommended for extremely heavy loads or serious off-road riding, as they can sometimes slip or potentially scratch the paint if not installed carefully.
The Universal/Strap Solution (Premium & Specialty Racks)
For a high-quality, long-term solution on a frame without eyelets, look to racks like the Thule Tour Rack. This type of rack uses a sophisticated, rubberized strap-and-clamp system that distributes the load evenly and prevents slippage and damage.
-
How it Works: The rack attaches via rubber-coated arms that securely grab the frame tubes. The connection is rock solid because the attachment arms are engineered to hold the load from multiple angles, making it a professional-grade alternative for installing a back rack on an e bike where drilling into the frame is a definite no-go. This is the only safe option for carbon frames.
-
Outbound Link: For a deeper understanding of bike frame materials and why eyelets are critical for load-bearing, you can refer to authoritative sources on bicycle frame design. Check out a quality resource on bicycle component engineering standards to enhance your knowledge of safe load limits.
🔋 E Bike Specific Considerations: Battery and Load Dynamics
One major difference when you install rear rack on electric bike compared to a traditional bike is the impact of the electric system. E bikes are heavier, faster, and often have a battery mounted directly to the down tube or integrated into the frame.
1. Increased Speed Requires Increased Security
Electric bikes accelerate faster and maintain higher average speeds. When carrying a load on an electric bike rear carrier, this means the dynamic forces acting on the rack are significantly greater. You must ensure all bolts are tightened to the correct torque (check the rack instructions) and that your cargo is secured with high-quality straps or a secure QR system. A loose load at 20 MPH is far more dangerous than one at 10 MPH.
2. Battery Position and Center of Gravity
Many e bikes have the battery mounted on the down tube, creating a lower, more forward center of gravity. This is good for handling. However, adding a heavy load to the back (especially on a rack with a 50 lb capacity like the Axiom Journey Universal Rack) can shift the center of gravity rearward, potentially making the steering feel lighter and the bike more prone to “wheelies” on steep climbs.
-
The Solution: When packing your panniers, always load the heaviest items (e.g., U-lock, tools, water bottles) as low as possible and as far forward as possible on the rack to counteract the rearward weight shift. If possible, consider a rack with a lower mounting profile, ensuring your rear cargo rack for electric bike keeps the center of mass as low as possible.
3. Tire and Frame Clearance
If your e bike is a fat-tire model, you need a specialized fat tire rack. The standard racks listed here will not be wide enough to clear the 4-inch or 5-inch wide tires. Always verify the inner width of the rack is appropriate for your tire size before purchasing.
➡️ Click Here to Shop the Top 7 E Bike Racks and Start Your Upgrade Today! 🛒
🌟 Conclusion: Transforming Your E Bike Experience
Learning how to install rear rack on electric bike is not just a DIY project; it’s the gateway to unlocking the full potential of your e bike as a genuine utility vehicle. From the commuter-focused efficiency of the Ibera PakRak Touring Carrier Plus+ to the off-road resilience of the Old Man Mountain Elkhorn Rack, the right rear rack installation e bike solution is out there.
By carefully considering your frame type, braking system, and cargo needs, you can select one of the robust, high-quality options reviewed here. A properly installed rear rack means a more stable ride, less back strain, and the freedom to carry everything you need, whether it’s a week’s worth of groceries or the gear for an epic weekend adventure.
Don’t let your e bike’s powerful motor go to waste by having to carry everything on your back. Take the leap, install that rack, and start riding smarter, not harder!
❓ Frequently Asked Questions
✅ No, the installation is generally straightforward and achievable for beginners with basic tools like Allen wrenches and a screwdriver. The main difficulty arises if your e bike lacks standard eyelets, requiring specialized clamps or thru-axle kits. Most standard bolt-on racks, such as the BV Bicycle Rear Rack Carrier, take less than 30 minutes to install with minimal expertise...
✅ The best rear rack for an e-MTB is the Old Man Mountain Elkhorn Rack, due to its extreme durability, customizable thru-axle mounting options, and proven stability on rough, off-road terrain. For a carbon e-MTB without eyelets, the Thule Tour Rack is the best choice, as it uses secure rubberized straps that protect the frame while offering a high load capacity...
✅ No, you absolutely cannot put a child seat on just any rack. Child seats require racks specifically rated for passenger use (usually 55 lbs/25 kg minimum) and designed to accommodate the child seat's specific mounting hardware. Always check that the rack is child-seat compatible and meets all local safety standards before attempting to install a back rack on an e bike for a passenger...
✅ Yes, if your e bike has disc brakes, a disc-brake-specific rack like the Topeak Super Tourist DX Disc Mount or the Axiom Journey Universal Rack is essential. These racks feature an offset or extended mounting system to clear the brake caliper, ensuring the rack sits level and securely. Using a standard rack on a disc-brake bike can lead to alignment issues and potential component damage...
✅ While some heavy-duty racks, like the Axiom Journey Universal Rack, are rated up to 110 lbs, the safe capacity is usually limited by the e bike's frame and wheels, not the rack itself. Most e bike manufacturers recommend a maximum rear load of 40-55 lbs (18-25 kg) for safety and optimal handling. Always adhere to the lowest load limit provided by either the rack or your electric bike frame... ❓ Is it hard to install rear rack on electric bike for a beginner?
❓ What is the best rear rack for an electric mountain bike (e-MTB)?
❓ Can I put a child seat on any rear cargo rack for electric bike?
❓ Do I need a disc-brake-specific rear rack for my e bike?
❓ How much weight can an electric bike rear carrier safely hold?
Recommended for You
- How to Replace e Bike Battery: 7 Must-Have Kits & Pro Tips for Effortless DIY Replacement
- 7 Best E Bike Conversion Kits 2025: Revamp Your Ride Now!
- Waterproof e Bike Accessories for Rainy Weather: 7 Essential Upgrades!
Disclaimer: This article contains affiliate links. If you purchase products through these links, we may earn a small commission at no additional cost to you.
✨ Found this helpful? Share it with your friends! 💬🤗